Sunday, August 31, 2014

memories **Birds of a Feather**

I have spent the last 5 years as a stay at home mom with my kids.  It is the hardest job I have done; no breaks, no holidays, no sick days, but endless hours of fulfillment knowing that I am doing the best thing I can do for my children, be with them.  The days are long and there are fights, tears, grumbles, lost shoes, messy floors, dirty clothes, home cooked meals, long morning cuddles, midnight wake ups, and endless hug.  I would not trade these days for anything!!


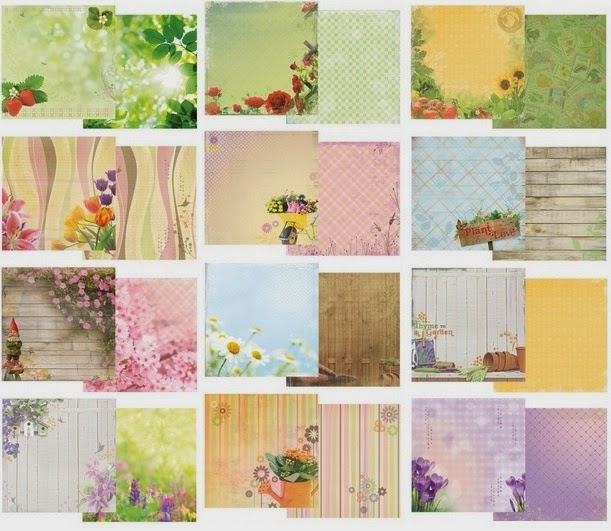
Here is a layout made with the beautiful August Birds of a Feather Kit.  I did a ton of fussy cutting on this, with lots of paper layers and some pretty bits and bobs of embellishments including the super cute gems!!


I used one of the Chalkboard tags and use it for a journal spot with  the Chalk Pencil.


I took the chipboard butterfly and applied white gesso to the top, then when it was dry I added in some of the glitter dots to make it pop.

Cardstock - Core'dinations - Birds of a Feather Aug Kit
Patterned Paper -  Kaisercraft & Marion Smith- Birds of a Feather Aug Kit
Chalkboard Tags - My Mine's Eye -  Birds of a Feather Aug Kit
Glitter Dots - KI Memories -  Birds of a Feather Aug Kit
Sequins - Hazel & Ruby -  Birds of a Feather Aug Kit
Grey Alpha Stickers - American Crafts -  Birds of a Feather Aug Kit
Trim & Jewels - Mon Ami Gabby -  Birds of a Feather Aug Kit
Chipboard - Fabscraps -  Birds of a Feather Aug Kit
Chalk Pencil - General's Pencils -  Birds of a Feather Aug Kit
Metal - Prima
Resin - Melissa Francis & Prima
Twine - May Arts Ribbon

Ink - Prima
Gesso - Prima
Adhesive - Scotch & Beacon
Enjoy!!

Saturday, August 30, 2014

Greatest Life **Birds of a Feather**


The smiles on our faces says it all - Joy, Laughter, Love, Fun!!  I rarely get pictures of myself with the kids, as I am usually the one taking the pictures, but my friend took some pictures of us this past February and caught me playing and tickling Catherine as we were walking from one venue to for a chance in background.  I just love that smile of hers, so carefree and happy!! 


I just love this August kit from Birds of A Feather, it is just beautiful.  I could work with this kit over and over and still not get bored with it.  I added extra doilies to the top and left corner with a mask and gesso and mimicked the idea of the words in the other doily by cutting them out of one of the cards papers.


Here I took the wonderful chalk pencil and made the came dotted outline on the chalkboard flowers as the leaves on the other set of flower in the kit.  I also layered in lots of those wonderful jewels from the kit under the nest of flowers below the picture.


August 2014 Kit-August Kaisercraft sparkle bling glitter rhinestones Marion Smith Hazel sequins dots mesh chalk pencil
Birds of a Feather Aug Kit
Aug-14 Extra Patterned Paper-kaisercraft Kaleidoscope paper august extra
Birds of a Feather Aug kit Extra PP
Aug-14 Extra Embellishments 1-crystal bling august prima chalkboard mesh glitter ribbon
Birds of a Feather Aug Kit Extra Emb 1

Catherine loves to be tickled, and it is part of our regular day for the tickle mommy to come out.  That my friend caught this fun little episode on film touches my heart, as it really is such a pure happy moment.  The best moments are those that you do not plan, they just happen!!

Cardstock - Core'dinations - Birds of a Feather Aug Kit
Patterned Paper -  Kaisercraft - Birds of a Feather Aug Kit
Chalkboard Tags - My Mine's Eye -  Birds of a Feather Aug Kit
Glitter Dots - KI Memories -  Birds of a Feather Aug Kit
Jewels - Mon Ami Gabby -  Birds of a Feather Aug Kit
Green Trim - Mon Ami Gabby -  Birds of a Feather Aug Kit
Flowers - Prima -  Birds of a Feather Aug Kit
Chalk Pencil - General's Pencils -  Birds of a Feather Aug Kit
Sequins - Hazel & Ruby -  Birds of a Feather Aug Kit
Resin - Prima
Doily sticker - Prima
Mask - Prima
Gesso - Prima
Ink - Prima
Adhesive - Scotch
Enjoy!!

Friday, August 29, 2014

Beach **Paper House Blog Hop**


Thanks for hopping along with us in our Goodbye Summer Blog Hop this weekend! We're so glad you're joining us, and hope you're inspired by all the amazing projects our Design Team has been creating!

To begin, just visit the first designers' blog in the list below. Look at her project, leave her a little bit of love in the comments section of her post, and click on through to the next designer on the list. Each blog will have the list repeated, so you shouldn't get lost along way! After you've visited and commented on each blog, just go back to the Paper House Productions Page and enter our contest to win a pretty awesome prize pack!


The awesome prize for this Hop is an Endless Summer Paper Pad. If you've been waiting for the perfect paper to scrap all of your summer memories, then wait no more, this pad is it. From it's amazing color palette to the perfect images, you will love every page!

There are a few ways to enter - the first two are freebies by liking us on Facebook and signing up to receive Facebook notifications from us (we don't want you to miss any of our great project posts!). But the big entry comes from commenting on each of our designers' posts! If you do, you'll get +5 entries into our drawing! AND, you can do that once a day for a total of 20 entries! That sounds like a deal!


Here are my beautiful boys playing in the surf at Galveston Beach this summer.  We met Grandma Marty, Aunty SuSu, Amanda, Allison, Aunt Steph, Uncle Robert, and Preston.  We drove down just for the day, but we spent that entire day in the sand.  The boys collected just about everything that was alive and placed them in buckets.  They caught shrimp, goby fish, seahorses, fiddler crabs, hermit crabs, sargassum, and seaweed.


I play around with the wonderful Paper House Beach stickers of all kinds - 3D, Die Cut, Canvas, and Chalkboard.  They have such dimension and texture and add so much o the feel of the layout.

http://www.paperhouseproductions.com/shop/scrapbooking/scrapbooking-shop-by-theme/scrapbooking-beach.htmlhttp://www.paperhouseproductions.com/shop/scrapbooking/scrapbooking-shop-by-theme/scrapbooking-beach.htmlhttp://www.paperhouseproductions.com/shop/scrapbooking/scrapbooking-shop-by-theme/scrapbooking-beach.html
http://www.paperhouseproductions.com/shop/scrapbooking/scrapbooking-shop-by-theme/scrapbooking-beach.html

I also used some of the Garden 12x12 Paper pack for some of the background layers, especially the ones with whites, greens, and blues to match the stickers - the colors were a perfect match!!
 
http://www.paperhouseproductions.com/shop/scrapbooking/scrapbooking-shop-by-theme/scrapbooking-beach.html


Supplies Used
Cardstock - DCWV
Patterned Paper - Paper House Productions
Stickers - Paper House Productions
Chalkboard - Paper House Productions
Chipboard - Paper House Productions
Canvas - Paper House Productions
Stain/Ink - Ranger & Prima
Burlap - May Arts Ribbon
Alpha Stickers - Glitz
Pencil - General's Pencils
Adhesive - Xyron & Beacon & Scotch


I have a little Paper House Giveaway too, a lovely assortment of Paper House Stickers!!!!  
Just leave a comment and follow my blog to enter!!
Come back on Mon Sept 1st to see the winner - all countries welcome!!


Goodbye Summer Blog Hop Designers


Make sure to hop through each designer down the list to be eligible for the most entries! When you're done, just hop back to Paper House and let us know, and enter the rafflecopter giveaway below! The hop will be running all weekend, so you have until Monday at 11:59pm EST to get your entries in!

a Rafflecopter giveaway

Thursday, August 28, 2014

Follow your Dreams **Birds of a Feather & Off the Rails**

My boys are so full of life, energy and are so much fun!!  They are almost to the day 4 years apart, and her they are at ages 8 and 4.  They love to play together and be rough and tumble boys through and through.

 
I used the beautiful Birds of a Feather August kit for this layout.  I love this paper, it has such grunge and  texture without having to do a thing to it, it already looks like I applied a ton of mixed media to the page.  I then layered a ton of items behind the pictures, more papers, cards, fibers, jewels, stickers, cardboard, and more.  I even took ones of the cards from the extra papers and cut up the sentiment and layered it along the cardboard section of the paper as my title.  This paper just screams BOY GRUNGE!!

August 2014 Kit-August Kaisercraft sparkle bling glitter rhinestones Marion Smith Hazel sequins dots mesh chalk pencil
Birds of a Feather Aug Kit
Aug-14 Extra Patterned Paper-kaisercraft Kaleidoscope paper august extra
Birds of a Feather Aug kit Extra PP
Aug-14 Extra Embellishments 1-crystal bling august prima chalkboard mesh glitter ribbon
Birds of a Feather Aug Kit Extra Emb 1
I added in a ton of grungy items to this page like torn papers (learn the Art of Paper Tearing here), wires pulled from the trim rolled up and glued, cork date sticker (from the April Kit), photo frames (from the March Kit), metals, rub-ons, burlap fibers (from the July Kit), and more.


Here you can see some of the wonderful jewels, bling stickers, blue trim, and chalkboard cards all layered up behind my picture.  I added in my own alpha stickers and roman numeral metals for the boys named and ages. 

The colors of the kit go perfectly with the September Off the Rails Challenge Mood Board.  Come play along with the challenge today!!
http://offtherailsscrapbooking.blogspot.com.au/2014/09/colours-of-gold-and-blue.html


Supplies Used
Cardstock - Core'dinations - Birds of a Feather Aug Kit
Patterned Paper -  Kaisercraft - Birds of a Feather Aug Kit
Chalkboard Tags - My Mine's Eye -  Birds of a Feather Aug Kit
Glitter Dots - KI Memories -  Birds of a Feather Aug Kit
Jewels - Mon Ami Gabby -  Birds of a Feather Aug Kit
Blue Trim - Mon Ami Gabby -  Birds of a Feather Aug Kit
Burlap Trim - May Arts -  Birds of a Feather July Kit
Cork Stickers - Freckled Fawn -  Birds of a Feather April Kit
Photo Frames - Basic Grey -  Birds of a Feather March Kit
Metal - Prima
Alpha Stickers - Glitz
Rub-On - Scenic Route
Acrylic - Other
Sticker - Authentique
Ink - Prima
Adhesive - Scotch
Enjoy!!

Tuesday, August 26, 2014

Art of Tearing Paper - A Tutorial **Birds of a Feather**


Did you ever know there were different ways to tear paper, depending on which hand you tear with (or side of the paper) gave you a different look?  Now you can learn!!  We were given all these beautiful Core'dinations papers that are just begging to be torn due tho the different cores they have, plus the torn papers just go with the style of the August Kit from Birds of a Feather.
 

Above you can see the the difference in the look of the paper after tearing, I do not use any special tools or anything, just the side I tore the paper on.  On the left you see torn edges but you do not see the core.  On the right side you see the core.  Both look great, it really all depends on what kind of look you want.

Method 1 - Core visible after tearing


The portion I tear is the part I throw away, so what I left is the part of the paper I want to use.  So I am throwing the paper on the right and keeping the one on the left.  Another way of thinking about it is to make sure the side of the paper I want to use is facing me and tear along the right side only. 


If I want to tear along all the edges of the paper, I keep turning the paper so I tear only on the right side throwing away the right side of the paper keeping the left.

 
Method 2 - Core NOT visible after tearing


This time you tear on the left side, so you are tearing the paper towards you same as above but this time the paper you are tearing down is the one you want to keep, not the one you are throwing away.  So keep the right throw away the left.  Another way of thinking about it is to make sure the side of the paper I want to use is facing me and tear along the right side only.


If I want to tear along all the edges of the paper, I keep turning the paper so I tear only on the left side throwing away the left side of the paper keeping the right.


Here you can see the difference between tearing on the right or the left side of the paper.  It is the same tear, just one way the core is on the top so you can see it and the other the core is on the bottom so it hides.


Here is a peak of one of my layouts using the tearing method 1 - having the core visible.  This gave me the ability to ink the edges giving even more texture to the page.

August 2014 Kit-August Kaisercraft sparkle bling glitter rhinestones Marion Smith Hazel sequins dots mesh chalk pencil
August Birds of Feather Kit


Enjoy!!
http://scraps-of-reflections.blogspot.com/

Monday, August 25, 2014

Happy Birthday **Just Imagine**

Here is pretty card I made for my mother.  Her birthday is this month and I wanted to create something special just for her.  A special card for a very special lady!!


I primarily used the 4.5in Pastel Cardstock in various colors, almost everyone one!! 

http://www.coredinations.com/

I used my wonderful Kreaxions Circle Cutter from Just Imagine to create all the circles.  I just opened up the dimensions little bit, by about 1-2 mm, to create the larger dimension of a circle so they nested nicely into each other into groups of 3 and then ran them through my Cuttlebug with embossing folders or with circle enhancing elements to create dimension and texture to the cardstock.   

http://www.justimaginecrafts.com/catalog/product_info.php?products_id=285

I even ran the purple background paper through the embossing machine 2 different times with two different
embossing folders to add even more dimension and texture.


After all the papers were embossed with various designs I then used the Sand It Gadget to sand the tops of the papers to allow the beautiful undertones of the paper to show through and then inked the edges in a light brown chalk ink.


http://www.coredinations.com/

The background paper of the card is in the beautiful Aquarium cardstock.  I needed something a bit bigger as a background to the card so I used a 12x12 sheet cut to size and the colors matched perfectly!!  I then used the same Sand It Gadget and sanded down the cardstock to let the colors come through.

http://www.coredinations.com/


Supplies Used
Embossing - ProvoCraft & Spellbinders
Flower - Prima
Ink - Clearsnap
Twine - American Crafts
Stickers - Kaisercraft


Share This

Related Posts Plugin for WordPress, Blogger...