Saturday, July 27, 2019

Upcycled Etched and Vinyl Kitchen Canisters

I have had these kitchen canisters for over 10 years.  I had them stuck in a cupboard for the last few years, really since our last move 5 years ago and almost passed them along to goodwill, then I got an idea - I am going to give them a bit of a makeover and bring them back to life!  So I pulled out some etching creme, vinyl, and a gold paint pen and had some fun!

This post also contains affiliate links and I will be compensated if you make a purchase after clicking on my links.  Various companies provided me with some product to create this project.  The opinions I share are solely my own.


Check out my video to see how to make these fun glammed up canisters!


Just to give a little idea of the before look of the canisters.


After giving each canister a good cleaning, I etched the top of each jar with Etchall etching creme using vinyl as a mask and die cut out with a metal die.


I changed up the patterns on each canisters, using different parts of the die cut vinyl mask.


I then used the gold paint pen to add some fun gold colors to the jars.  It won't rub off since I gave the porcelain a "tooth" when I etched it.


i just love the etched look with the gold!


Then I cut out more section of vinyl this time in silver with the same die.  I used the etch mask to apply the vinyl to the jars so it went of even and aligned the way I wanted it to be.


I added all kinds of fun deigns to the sides of the containers.


I love the finished look of these containers, not sure if they will stay in the kitchen, as of right now they are in my craft room being used for crafty storage!


What fun item do you have in your house that you can alter and make new again?


Supplies Used
Interested in the supplies I used in this project?  Most are listed below and some are affiliate links, which generates a me little commission (at not extra cost to you at all) when you click on the link and make a purchase.  Affiliate and product disclosure can be found here.


Amazon Storefront
Amazon Storefront
Shop at:
AZ
Favecrafts
Favecrafts
Shop at:
O
Sizzix Big Shot Plus
Shop at:
SB | O
Fiskars Craft Knife
Fiskars Craft Knife
Shop at:
SB | AZ
Fiskars Scissors 8
Fiskars Scissors 8"
Shop at:
AZ
Etchall Etch Mask
Etchall Etch Mask
Shop at:
AZ
Etchall Creme
Etchall Creme
Shop at:
AZ | O
Etchall Squeegee
Etchall Squeegee
Shop at:
AZ | O
Fiskars Paper Trimmer
Shop at:
SB | AZ
Etchall Vinyl
Etchall Vinyl
Shop at:
AZ | O
Tape Technologies Inc Vinyl
Shop at:
AZ
Paper Rose Moroccan Square Die Layer 1
Shop at:
SSS
Deco Color Liquid Gold Pen
Shop at:
AZ


Friday, July 26, 2019

Upcycled Ombre Tissue Jars

I love a good upcycle and jars especially!!  I tend to keep fun shaped jars for years waiting for the perfect project.  Today is the day for that perfect project and these jars and a little tissue paper.

This post also contains affiliate links and I will be compensated if you make a purchase after clicking on my links.  Various companies provided me with some product to create this project.  The opinions I share are solely my own.


Check out my video to see how easy these are to make!!


I started with out a couple of small fun shaped jars.  I really do not even remember where these came from, but they did have a lid that I chose not to use for this project.  They are small, only about 3 inches tall.  I then grabbed some of my kids tissue squares from their craft supply and picked out the colors that I liked, you know it had to be blue, hehe. Last I grabbed my Xyron Creative Station Lite with the permanent adhesive refill inside and I was all set to make some fun jars.


This is such a no muss no fuss project as you make the tissue squares sticky.  Just pop them inside the Xyron Creative Station Lite and turn them into stickers!


Then you just add the sticky tissue squares to the jars.  My jar I scattered all the squares and did not follow any kind of pattern to fill the jar.  I like it, but I wanted to try something a little different with the next 2.


For the last two jars I decided to do an ombre effect with the 3 colors of tissue, one going top top bottom, and the other jar going from bottom to top.  I love how they turned out, and they even look like they would be a perfect fit in a beach house!


I just love how easy these are to make, and such a great craft for the kids too!!!


What fun upcycle are you going to make?

Supplies Used
Interested in the supplies I used in this project?  Most are listed below and some are affiliate links, which generates a me little commission (at not extra cost to you at all) when you click on the link and make a purchase.  Affiliate and product disclosure can be found here.


Amazon Storefront
Amazon Storefront
Shop at:
AZ
Favecrafts
Favecrafts
Shop at:
O
Xyron Creative Station Lite
Shop at:
AZ
Xyron 5
Xyron 5" Permanent Refill
Shop at:
AZ
Tissue Squares
Tissue Squares
Shop at:
AZ


Friday, July 12, 2019

Double Z Fun Fold Cards

I have another fun fold card for you today!!  This one is Double Z Fun Fold card that is so easy, but looks so hard - such a fake out!!!

This post also contains affiliate links and I will be compensated if you make a purchase after clicking on my links.  Various companies provided me with some product to create this project.  The opinions I share are solely my own.


Learn how to make these cards in the video below.


I used the wonderful Ida Rose Stamps on the cards.  They are so cute and there is a giveaway going on via my video - so watch the video to see all in the info about the giveaway!!   The first card i made using the Birds of a Feather stamp set.


When it opens it pulls apart to reveal the Double Z portion of the card.  Inside is a sweet sentiment stamps also from Ida Rose Stamps!


To hold all the paper layers of the Z fold together I used my Xyron Tape Runner - a card makers tool!!  


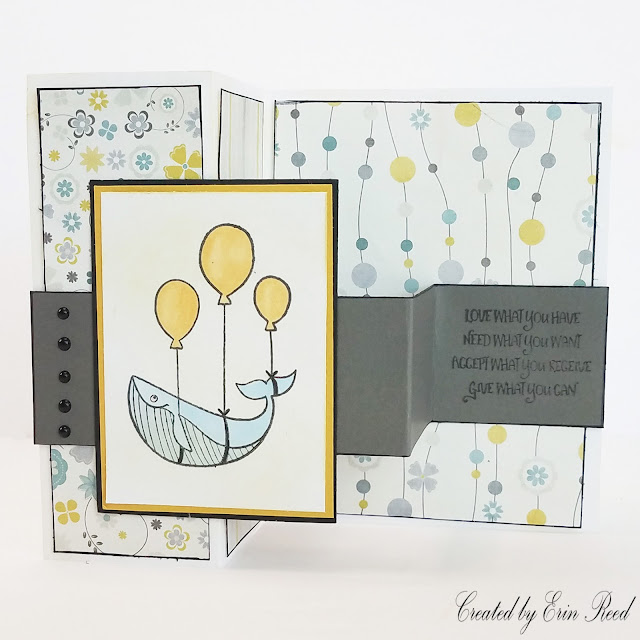
The second card had a cute whale on the front with balloon as part of the air lift Ida Rose Stamp set. 


Check out how this card looks opened up!


I used the same stamp set to make the 3rd card, but this time a cute elephant!


If you notice when the card is opened parts of the center stamped image should not have adhesive, only the left and center need to be stick down.


I of course applied my Xyron Taper Runner adhesive to the whole back section, but the easy fix is the Xyron Adhesive Eraser, it took off my excess sticky stuff so that my card would open!!  Fun fact - this adhesive eraser is about 5 years old - they last forever!!!


So now that everything is stuck to the correct places and not where it should not be, the card can open up to make the Double Z fold like seen below!


These are such cute cards to make that have a big WOW but are really easy to make!


Supplies Used
Interested in the supplies I used in this project?  Most are listed below and some are affiliate links, which generates a me little commission (at not extra cost to you at all) when you click on the link and make a purchase.  Affiliate and product disclosure can be found here.

Amazon Storefront
Amazon Storefront
Shop at:
AZ
Favecrafts
Favecrafts
Shop at:
O
Xyron Tape Runner Refil
Shop at:
AZ
Tonic Nuvo Crystal Drops
Shop at:
SB | SSS
Xyron tape runner
Xyron tape runner
Shop at:
AZ
Xyron Adhesive Eraser
Shop at:
AZ
Pink Paislee Papers
Pink Paislee Papers
Shop at:
SB
Stamp Block
Stamp Block
Shop at:
SB
Fiskars Paper Trimmer
Shop at:
SB | AZ
Ida Rose Stamps
Ida Rose Stamps
Shop at:
O
Arteza Gel Pens
Arteza Gel Pens
Shop at:
O
Colored Cardstock
Colored Cardstock
Shop at:
SB
Bazzill Cardstock
Bazzill Cardstock
Shop at:
SB
SSS Black Ink
SSS Black Ink
Shop at:
SSS
Copic Markers
Copic Markers
Shop at:
SSS
Arteza Alcohol Pens
Arteza Alcohol Pens
Shop at:
O


Share This

Related Posts Plugin for WordPress, Blogger...