 |
| Sorry this picture is so grainy, I needed to get it taken so I could submit it for the contest. |

Wednesday, October 27, 2010
Scraps on a Budget - Sketches in Thyme Contest
For this LO I used the Sketches in Thyme sketch. I also used papers from Target from their dollar bin, so this LO is only about $.50 total. Enjoy!!
Monday, October 25, 2010
New Prima October 2010
Prima Product Pick-October & A Winner!
October's PPP is FILLED with delightfully spooky products which are perfect for your Halloween (and fall) projects!Just look a the gorgeous flowers offered in purples, oranges and black...the whimsical chandelier-patterned Little Boo paper...smoky black E-Line pearls and alphas, creepy, crawling vines, and sparkly orange Sultan centers!
Prima has a wide variety of perfectly coordinating embellishments to go on your next project! Make sure to check these out for all your crafting needs.
For more info on Prima please see their site at Prima
Monday, October 11, 2010
Pages for my next class
I am hosting my next scrapbook class on October 23rd, 2010. The two layouts are below.


I used water distressing and misting for both of these layouts. I also used my new zutter distress it all tool, so much easier than using your scissors to distress.
I was playing around with my sweet layout and found I felt that it might have needed something , so I altered it with these great flowers I got from a friend at another site http://sketchesforyou.ning.com/. I entered a challenge to make these wonderful flowers you see on the layout below. Tutorial to make them is at this site Fringe Flowers. They are too fun to make, enjoy!!

Sunday, October 3, 2010
Little Paper Letters
On many sketches and LO I have seen I see these little cute letters. This is my take on how they are done.
1) Materials - ink, cardstock, scissors, adhesive, chalk, and letter stamps (I prefer rubber stamps for this).

2. Stamp out the letters for the word you want. Do not do them order, stamp vertically, this gives it more of the illusion that they are not just cut out of a line.
 3. Cut out the letters, do not worry that they are not perfect, this adds to the fun of the letters.

4. Ink all the sides, I like to use chalk for this, but ink works too.

5.I like to use my Xyron for these little letters (they are about 1 cm square when done).

6. Place them on your LO. They looks so cute and they are so easy.


Below are some LOs that I used this technique on. You can also do words, or use printed or hand written letters or words for the same effect.


1) Materials - ink, cardstock, scissors, adhesive, chalk, and letter stamps (I prefer rubber stamps for this).

2. Stamp out the letters for the word you want. Do not do them order, stamp vertically, this gives it more of the illusion that they are not just cut out of a line.


4. Ink all the sides, I like to use chalk for this, but ink works too.

5.I like to use my Xyron for these little letters (they are about 1 cm square when done).

6. Place them on your LO. They looks so cute and they are so easy.


 |
| September Birthday - also has the retro V flowers that I did a tutorial in August. |


Tuesday, September 28, 2010
Ribbon Star Flowers
I am sure you may have done these before, but here is my take on a cute little ribbon flower.
1. Items you will need. Ribbon (this about 1 cm in width), paper piercer, brad, and a lighter.

2. Cut your ribbon to about 1 inch in length, you can make it longer if you wish. You will need 5 one inch pieces per flower, I cut enough for 2 flowers here.

3. When you cut the ribbon it will fray, so I used a lighter and lightly burned both ends of the ribbon so it would not fray or pull apart.


4. Using your paper piercer, pierce one end of the ribbon to make a hole (if you use a mouse pad or foam mat under your ribbon it makes making holes much easier). The take the ribbon off the piercer and push it onto the the brad in the hole you just made.


5. Do the same for the rest of the ribbons until you have 5 total on your brad. Make sure you fan them out so they do not overlap.

I hope you found this useful. Enjoy.
1. Items you will need. Ribbon (this about 1 cm in width), paper piercer, brad, and a lighter.

2. Cut your ribbon to about 1 inch in length, you can make it longer if you wish. You will need 5 one inch pieces per flower, I cut enough for 2 flowers here.


4. Using your paper piercer, pierce one end of the ribbon to make a hole (if you use a mouse pad or foam mat under your ribbon it makes making holes much easier). The take the ribbon off the piercer and push it onto the the brad in the hole you just made.


5. Do the same for the rest of the ribbons until you have 5 total on your brad. Make sure you fan them out so they do not overlap.

I hope you found this useful. Enjoy.
Tuesday, September 14, 2010
Scraps of Darkness Contest
Here is my entry for the Scrap of Darkness Contest, for info about scraps of darkness or about the contest please visit their blog at Scraps of Darkness.


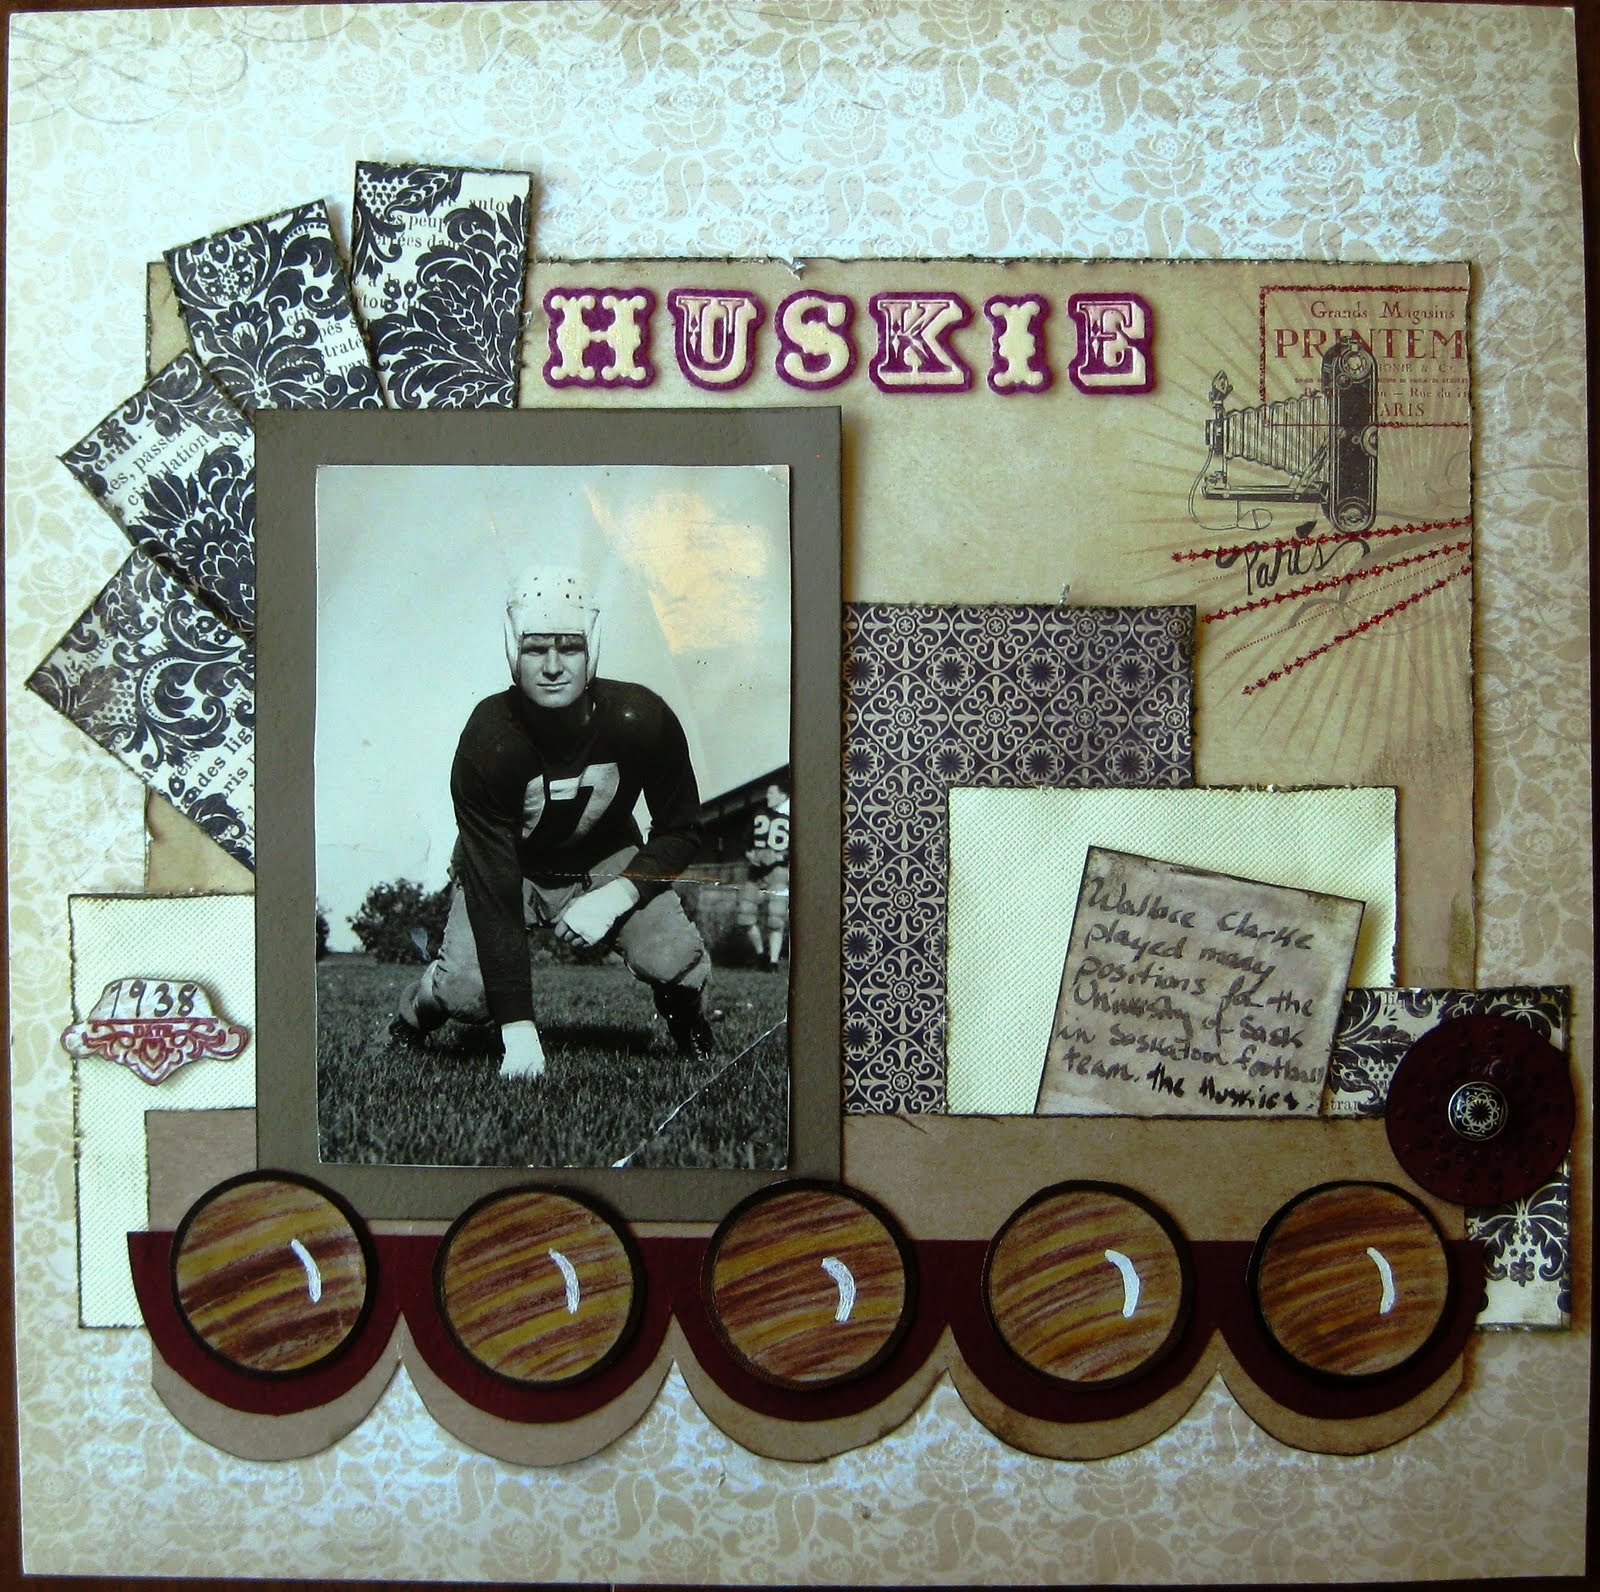
Saturday, September 11, 2010
Faux Sandstone or Tigers eye Gems
I follow another blog http://gabriellepollacco.blogspot.com/, she has such wonderful pages and ideas. One of which was faux polished stones. I loved it, but I needed brown gems, and I had only seen her gems as green or blue (turquoise gems). So i thought, why not a tiger's eye or sandstone version.

1. What you need: brown ink, round punch (or shape you see stones), white gel pen, various shades of brown and tan map pencils, white map pencil, and kraft paper (or a medium tan cardstock).

2. Punch a circle out of the kraft paper and run around the edge of the paper to soften the edges and also to create a shadow effect to give the illusion of a dome shape. I like to use my finger to ink the edge (I press my thumb or finger into the ink then rub against the paper to give the shadow effect).


3. Take one of the brown pencils and start drawing lines, slightly curved. Make some think and thin, blend some together.


4. Using the white pencils blend the lines together and to also fill in some of the gaps.

5. Using the white gel pen create the illusion of a dome ans shine, draw a thick white curved line.

6. Most stones are set in metal, so to create that look i took dark brown cardstock and cut out another circle about 1/8th of an inch bigger than my faux stone. I then took a shiny paint like smooch ink in molasses to painted around the edge.

7. Place you faux stone on top of your faux metal setting and you are done!!


I would really like to thank Such a Pretty Mess Blog for this great idea!!

1. What you need: brown ink, round punch (or shape you see stones), white gel pen, various shades of brown and tan map pencils, white map pencil, and kraft paper (or a medium tan cardstock).

2. Punch a circle out of the kraft paper and run around the edge of the paper to soften the edges and also to create a shadow effect to give the illusion of a dome shape. I like to use my finger to ink the edge (I press my thumb or finger into the ink then rub against the paper to give the shadow effect).


3. Take one of the brown pencils and start drawing lines, slightly curved. Make some think and thin, blend some together.


4. Using the white pencils blend the lines together and to also fill in some of the gaps.

5. Using the white gel pen create the illusion of a dome ans shine, draw a thick white curved line.

6. Most stones are set in metal, so to create that look i took dark brown cardstock and cut out another circle about 1/8th of an inch bigger than my faux stone. I then took a shiny paint like smooch ink in molasses to painted around the edge.

7. Place you faux stone on top of your faux metal setting and you are done!!

I would really like to thank Such a Pretty Mess Blog for this great idea!!
Subscribe to:
Posts (Atom)