Saturday, November 30, 2013

Ornament Trio - Part 1 **Susan K. Weckesser**

I keep seeing all these cute little ornaments everywhere, glass or plastic balls that are hollow, spherical just begging to be filled with something.  So I did!

Here is the trio I made using lots of items from Ranger, Core'dinations, May Arts ribbons, and of course Susan K. Weckesser stamps!!


 You can find these spherical ornament balls at any craft store, I got plastic ones because they will inevitably be dropped my me or my kids  You pop the top off and fill let you imagination soar.


For the first ornament I used Ranger alcohol inks and placed a few drops of reds and greens inside the ball and swirled it around.  


I then took the flag banner stamp for the Create your Day stamp set from Susan K. Weckesser and stamped the outside of the ball in black solvent ink.

Create your Day 1

I then took a cluster of flowers on wire stems and wrapped it around the top of the ball, attached the top, created a ribbon just under the flower cluster, and then strung it up with some beautiful gold wide ribbon from May Arts Ribbon.


For the Second ornament ball I stuffed the inside of 2 long stands of May Arts Ribbon (wide red and wide green) and tied a large bow with coordinating red and green ribbon, added the top back on, and strung it up with the same May Arts ribbon as the bow.  Could not be any easier!!


For the third ornament I heat embossed the cute little snowman stamp from Susan K. Weckesser's Let it Snow stamp set on Black Magic paper from Core'dinations.  You then sand the paper down and it creates a resist of the stamp after it has been heat embossed.  

http://www.susankweckesser.com/welcome


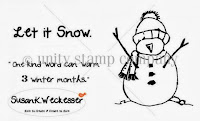
I then cut out the little snowman and used Stickles by Ranger in various colors and dusted him in flower soft to make it look like he is dusted in snow.


I then placed the snowman in the ball hung from the topper so it would not fall over, and filled the bottom of the ball with diamond dust so it looked like the snowman was sitting in snow.


 I then added in a flower cluster to the top along with a bow in silver ribbon for May Arts Ribbons.


Strung up the ornament with gold ribbon from May Arts Ribbon and it is done!  My little winter snowman in a ball!

.

Supplies Used
Ball Ornaments - Recollections
Ink/embossing/Stickles - Ranger
Ribbon - May Arts Ribbon
Cardstock -  Core'dinations
Stamps - Susan K. Weckesser
Flowers - Prima, Petaloo, Recollections
Diamond Dust - Flora Craft
Flower Soft - Flower Soft

Enjoy!!


http://scraps-of-reflections.blogspot.com/

Sunday, November 24, 2013

CLC Ranger Prize Winner

 It was so fun to see all the wonderful projects everyone was making for others for the Christmas Love Campaign, so inspiring!!

So now for the winner!!

Donna Sullivan!!

Grats, please email me you info for your prize!!

Thursday, November 21, 2013

A grateful heart is a joyful heart - card - With Resist Stamp Mist Tutorial **The Art Studio @ SNR**

I love seeing those beautiful background of papers from tons of different companies - they look distressed, dimensional, and gorgeous.  Here I will show you how I made a small 6x6 distressed misted paper for a card using stamps, ink, and mists.


 Resist Stamp Mist Tutorial

1) Supplies - Cardstock (light colored - tan, white, cream), spray mists in your choice of color, ink in your choice of color to correlate with your mists, and acrylic stamps.

2) When picking out your stamps use one that looks like the object you want to stamp, resist spraying will not show the detail of the stamp, just the outline.  I chose a leaf shape (butterflies, hearts, flowers, birds all work great too).  Lay your stamp on the paper flat side down (so there are no gaps between the paper and your stamp, raised parts facing up).  Spray your mist lightly, carefully pick up your stamp, move to a new location on the paper, spray with a different color (start with your lightest color first then move to your darkest color last), keep rotating and spraying until you have the look you want.


 3) I added a few drops of mist from the stamp leftover from misting resist technique to drop onto my paper for a better effect.


4) Pick out a different stamp for contract effect.  I went for another leaf stamp and chose a dark color (brown) for contrast.  I use a solvent ink (like StazOn) for this so it would not bleed into the wet mists.  I used both primary stamps (just applied ink to the stamp) and secondary stamps (stamped 2 times before reapplying ink to the stamp).  Stamp around the page, coming off the paper, across, layer it - remember this is supposed to look distressed and shabby!!


 5) Stamp in your resist spaces you created with the front side of the stamp (fill in the holes).  Pick a color that is similar to your mists (I chose orange) in a distress ink.  Steps 4 and 5 and be done in either order.


6) Now you can chose to do what you like with your new background paper.  You can make your paper as large as a 12x12, or cut it up and use it as your wish!!

Come check out all of the great ideas and projects at The Art Studio Blog!!

Supplies used:
Cardstock - Core'dinations and DCWV
Patterned paper - Glitz and Graphic 45
Ink - Ranger and StazOn
Mists - Heidi Swapp and Dylusions
Flower - Maya Road
Bling - Prima
Twine - Other
Stamps - Prima and Inkadinkado
Leaf Doily - Dollar Store
Leaves - Other

Enjoy!!

Monday, November 18, 2013

Fancy Pants Corrugate Paper Product Review **Flamingo Scraps**

I recently got to play around with some of the Corrugate Paper from Fancy Pants, and compared to cardboard this won hands down!!

In the pack you receive 6 12x12 sheets in colors as seen below.

http://flamingoscraps.com/shop/
 The colors are fantastic, they cut through my cutter with ease, and look wonderful on all kinds of paper projects!!  You could use these papers as is, or use paint, mist, ink, or other mediums to dress them up.  There are just so many uses for these papers!!

 Here you can see how you can tear or cut the paper (pictured in grey), one side is torn and the other was cut using a Fiskars blade cutter.


Here I played with the ridges of the paper and Heidi Swapp Color Shine mists to see how well it would hold color.  It worked beautifully.  It retained the color with only have to spray it once.


Here I took the same misted corrugate paper and inked the tops of the ridges with dark brown to create a contrast, and it turned out very cool.  Now I can't wait to try this sheet out on a project!!  Come back soon to see what I did with it!!


You can find this product plus many more over at Flamingo Scraps.  

Enjoy!!


Saturday, November 16, 2013

Resist Stamp Mist Tutorial **The Art Studio @ SNR**

Want to learn a a different way to use your stamps and mists?  

Come check out my post at:


Use Resist Stamp Misting to create cool background paper like the one below!!


 Enjoy!!
 

Friday, November 15, 2013

Christmas Love Campaign **Susan K. Weckesser**

 Handmade Christmas Giveaway

Are you making any handmade gifts, cards, tags, ornaments, or gift bags for the holidays (can be paper, sewing, jewelry, kid crafts, anything!!)?  If you are, I also invite you to check out Susan K Weckesser’s Christmas Love Campaign and her Design Team’s Hand-Made Christmas projects.  There are lots of prize packages being offered throughout the Holiday Season.  

Here is a few things my 3 year old son made to give to family and his teacher.


And in the spirit of giving, I am offering my Fans and Friends a chance to win a prize package from Ranger Ink possibly containing such goodies as stencils, aprons, Distress Inks, pens, & ink pads.   Each bag from the various design team members will be different, so you never know what you may get.  

So, what do you have to do to win? 

  1. Create something hand made to randomly give someone.  Here is my handmade project that I posted last week.


  2. Click on the picture to see how I made this!

     
  3. LIKE Christmas Love Campaign Facebook page


  4.  
  5. Share a picture of your project – you can write a blog post and share the link or share your project picture directly to the Christmas Love Campaign Facebook wall


  6.  
  7. LIKE Ranger Ink and tell them thanks for sponsoring Christmas Love Campaign


  8.  
  9. Finally, come back here and let me know you did these things and where I can see your project! 
 
**You have until Monday night at midnight – 11/18/2013 midnight CST to share and leave me a comment on this blog post**


 Susan K. Weckesser Design Team

Wednesday, November 13, 2013

life is good **Flamingo Scraps**


My sweet son Morgan started off 2rd grade two weeks late and at a completely new school (as we just moved).  He started off a bit rough, but he is now loving his new school, has great friends, and never even asks about his old school or house any more. Doesn't this kid take great pictures? I know I am a bit biased as his mom, hehe.


I used the wonderful kit Hey Kid from Pink Paislee for the stickers and patterned paper, plus some other fun little bits and bobs. I used lots of ink and mists from Prima and Heidi Swapp to create the ring marks, spots, splatters, and sprays.  It just gives your layout such great dimension by adding in some great texture. 


 Don't you just love this Fancy Pants wood title - it works with so many projects!!  I even took a Prima dot stamp with some Prima ink in light brown to give it texture.  I also used other little bits of wood items (stars and arrows) from Cosmo Cricket.  Plus you can see a little of the Corrugate paper from Fancy pants in grey peaking out!

You can find most of these supplies used for this project at Flamingo Scraps!!  Plus don't forget about the awesome warehouse box sale going on, tons of goodies stuffed into shipping boxes for a great low price - make a great present!!

Supplies Used
Cardstock -American Crafts
Patterned Paper - Pink Paislee
Corrugate Paper - Fancy Pants
Stickers - Pink Pasilee
Die cuts - Pink Pasilee
Mists - Heidi Swapp
Ink - Prima
Wood - Fancy Pants and Cosmo Cricket
Twine - other
Metal/Staples - Tim Holtz
Punch - Martha Stewart
Stamps - Prima and EK

Enjoy!!

Tuesday, November 5, 2013

Paper Cone Tree **Susan K. Weckesser**


Every year Susan K Weckesser hosts the Christmas Love Campaign (CLC)
This is her mission:


When: November 1, 2013 - January 7, 2014

The Mission: Create something (anything crafty), cards, sewing, editable art, beads, you name it, and then give it to someone. ANYONE....even a TOTAL STRANGER!

Instructions on HOW to Enter:

TAKE a picture of what you have created.


Upload your picture. 

SHARE your Christmas Love Story.

Invite a friend to join in and Grab a Christmas Love Campaign Blinkie. Your name will then be entered into win one of several random draws that will be happening during the duration of the Christmas Love Campaign. If you have problems please email susiebeestudios@gmail.com

Here is my project to share with you – coming from our wonderful sponsors (Ranger, Fancy Pants Designs, MayArts Ribbon, Canvas Corp, Core’dinations, and more).

I wanted to create something that would stand out, something that could be a center piece, rest on a mantle, or a hall table, and not just another ornament.   So I searched around and found this cute idea of rolling paper into cones and making a tree out of them.

I used a paper towel roll as the center of the tree, it is about 11 inches long, but you could create taller ones with wrapping paper tubes, cutting them down to any length you want.  I then took the Black Magic and Brights cardstockfrom Core’dinaions (along with their sanding tool and dust collector to create the distressed papers) and patterned paper from Fancy Pants Designs and Canvas Corps to create the cones for the “leaves” of the tree.  


  I used both adhesive and tape to hold the cones together.  First you use a square size paper (the bottom row is a 6x6 size, then 2 layers of 5x5, then one layer each of 4x4, 3x3, then lastly 2x2), then roll them into each other to create the cone seen above.  You then tape each cone to the paper towel roll (start about 2 inches up from the bottom of the roll).  Start taping all the way around the tube (took me about 8-11 cones per row – smaller cones take more), to create layers for your tree.


After the entire tree was covered with cones I sprayed some Tattered Angels Chalkboard mist in Ferrari Red to cover up the insides of the cones that were not red or green and to give it more of a shabby chic look.  I used a Susan K. Weckesser Stamp to create the little balls hanging from the tree.  I stamped on green paper, punched out the circles with ornament shaped punch, inked the edges with black ink, and attached them to the edged of the tree with little jingle bell brads.


 For the tree topper I created a pom-pom by winding the fibers in red and green (from Canvas Corps and May Arts Ribbons) around a U shaped tool (seen below) many times around, about 100. 

You then tie it around the center in a knot to hold it together, and then cut the loops at the end to create a pom-pom.  I tied a bow on the front for a bit more fun!!


 I hope you enjoyed my little tree - now to decided who is getting it :)

Enjoy!!

Supplies Used
Cardstock - Core'dinations
Patterned paper -  Fancy Pants and Canvas Corps
Sanding Tool and Dust Collector - Core'dinations
Ribbons - May Arts and Canvas Corps
Mist - Tattered Angels
Stamp - Susan K. Weckesser
Ink - Ranger
Brads - Recollections

Share This

Related Posts Plugin for WordPress, Blogger...