
I always love to make something special for all my kids teachers especially for Christmas. This year it was more about the outside of the gift than the inside, but the inside had some really yummy homemade peanut butter chocolate crunch bars. We ended up giving these glittery gifts to more than just the kids teachers, we also gave some to the principals at my eldest school.

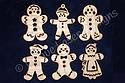
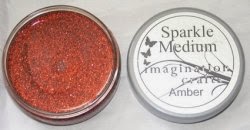
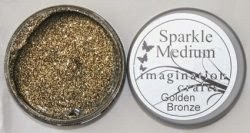
I used the wonderful 6 piece set of Gingerbread Ornaments from Unique Laser Designs as the base for the for these gifts. Each ornament comes with its own string to hang up on the tree, they are all unique, really perfect just on their own, but I decided to glitter them up using the wonderful Sparkle Medium from Imagination Crafts in Royal Purple, Amber, and Golden Bronze!! Below is a tutorial on how to glitter these fun little ornaments with this amazing Sparkle Medium.

Techniques for Glittering Intricate Chipboard or Wood
1) Start with the chipboard or wood of your choice (these are wood). I used these cute little Gingerbread ornaments, but as you can see there are lots of cutouts in the men, and that is what gives them their charm, but hard to glitter without getting in all the crevasses. Below are some tips.

2) If you just do a light coat with the glitter (like below), it looks great, but for these gifts I wanted a complete coverage so I needed to apply a thick coat of Sparkle Medium to the entire surface.

3) Once you apply the thick coat of sparkle medium with a foam brush it covers up most of the details of the ornament, but that is an easy fix!! Hint- only do one side of the ornament at a time so it has time to dry and not smudge.

4) Using needle, thumb tack, paper piercer, or other long thin object (I used my paper piercer and cleaned it up really well after) poke the tip into the holes of your object to scrape out the extra glitter inside. You may have to do this a few times in the front and back of each hole, wiping away the extra that builds up with the foam brush. This step takes some time, but really worth it in the end.

5) It takes about 2-3 hours to dry due to the thick layer or glitter medium applied, but they look amazing when they are done. They are now super sparkly and perfect for these gift bags.

6) I used plain lunch bags as the base for the gifts. I filled the bags with the yummy homemade treats, folded over the top a couple of times (squeezing out the air) and stapled it at the top. I then took a hole punch and punched 2 holes at the top and used green satin ribbon and laced it through the holes tying a simple bow lacing the ornament string in as I tied the bow and let it hang down the bag.

These gifts are filled with homemade goodies, topped with a homemade glittery ornament, and place in a homemade gift bag. It is a simple gift, but it is one from the heart to show my kid's teachers just how much I appreciate them. When I taught the best presents given to me were the ones that were made not just a simple gift card, it meant so much more that the parent or student took the time to create something for me - straight from the heart, and years later those are the presents I remember and still have!!

Supplies Used
Ribbon - May Arts
Foam Brush - Plaid
Paper Bag
Hole Punch
Staples
Paper Piercer
Enjoy!!

Great tutorial Erin.
ReplyDeleteHugs
Linda xxx
Fab tutorial Erin. Carol x
ReplyDelete