Showing posts with label kreations. Show all posts

Tuesday, December 23, 2014

Merry Christmas **Robin's Nest & ULD**

These are pictures of a friend's daughter back in 2003 on Christmas Eve and Christmas Day in her pretty outfits and her new present of babies, strollers, and baby baskets.


I used the wonderful Robin's Nest papers, Dew Drops, and rub-ons and Unique Laser Designs (ULD) wood shapes to create this page.  For more info about the Robin's Nest products please visit their blog.


Along the bottom of the page and also as the banner at the top I used the wonderful Flame Glitter swirl, the pops of the glitter stars of just wonderful.  I used the Christmas Words Glitter paper for the title and also sections of the plaid in the cluster in the top left corner.  I also used a little strip of backside of the Vanilla Fleur Glitter Cardstock (it has these wonderful stripes along the bottom of the entire project) and then added in the Gold Dew Drops.  I used the backside of the White Pinetree Cardstock, it has this wonderful green swirly patterned that fit wonderfully with the page, you can see section of it in the picture above.

http://www.shop.robinsnest-scrap.net/Christmas-Collection_c38.htm
http://www.shop.robinsnest-scrap.net/Christmas-Collection_c38.htmhttp://www.shop.robinsnest-scrap.net/Christmas-Collection_c38.htm
 

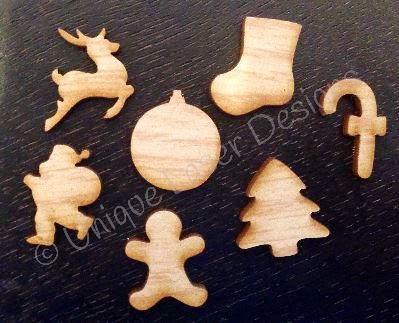
Here you can see one of the many clusters I created on this page using the cute little wood ginger-man shape from ULD inked with a brown chalk ink and then added in the wonderful Gold Dew Drops to act as buttons from Robin's Nest.  You can also see the Gold Classic Swirl Glitter Cardstock and Red Classic Swirl Glitter Cardstock in the background.
http://www.uniquelaserdesigns.com/

http://www.shop.robinsnest-scrap.net/Christmas-Collection_c38.htm

http://www.shop.robinsnest-scrap.net/Christmas-Collection_c38.htm
 

Here is another little Christmas wood piece from ULD that I inked in green chalk ink and topped with a gold Dew Drop to act as a star.


Here are 3 more cute little Christmas wood pieces from ULD inked in red and brown chalk ink, then linked together with twine and topped with little gold Dew Drops to act as bells on the reins.


Here is another wood tree and also a close of of the wonderful Rub-on from Robin's Nest.  I just love this Santa, it is just the perfect vintage rustic Santa!!
http://www.shop.robinsnest-scrap.net/Christmas-Collection_c38.htm

It is never to late to scrap those Christmas pictures of years past, so dig them out and get in the merry mood!!

Supplies Used
Cardstock - DCWV
Patterned Papers - The Robin's Nest
Glitter Cardstock - The Robin's Nest
Dew Drops - The Robin's Nest
Rub-ons - The Robin's Nest
Wood - Unique Laser Designs
Ink - Prima
Flowers - Prima
Stickers - DCWV
Ribbon/twine - May Arts
Circle Cutter - Kreaxions - Just Imagine
Adhesive - Tombow
Trimmer - Fiskars
Enjoy!!
http://scraps-of-reflections.blogspot.com/

Sunday, December 14, 2014

Snow **The Robin's Nest & Imagination Crafts**

A friend of mine asked me to make a page for her about her daughter's first time in the snow.  She loved being int he snow, but hated wearing all the warm clothing.  Below is a picture of her family all bundled up in the snow outside watching the snowflakes come down.


I used the wonderful papers, dew drops, and rub-ons from The Robin's Nest to and mediums from Imagination Crafts to make it sparkle.


I first laid out most of the base of the page of papers from The Robin's Nest and then wanted to use the Imagination crafts Flourish stencil and Spatula with Snowtex to give it that snowy feeling.  I also added the Snowtex randomly around the page to give it a even snowier feeling.
http://www.shop.robinsnest-scrap.net/

IC Flourish Stencil
Spatula


Once it dried it had this wonderful texture in white that the Mica Powders from Imagination Crafts stuck to wonderfully.

To some sections I blended white, brown, green, and blue to make a teal color that matched the papers and brushed it over the flourishes on the bronze papers.  See the beautiful Snow rub-ons from The Robin's Nest, I used the word snow and some of the snowflakes.

IC Mica Powder
http://www.shop.robinsnest-scrap.net/


Here is some of the beautiful papers from The Robin's Nest that I then added silver Detail Sparkle Glitter in Silver from Imagination Crafts to the swirls to give them even more sparkle!!

http://www.shop.robinsnest-scrap.net/
IC Detail Sparkle


Here you can see some of the trim I used around the edge of the picture.  I had this wire covered glitter with a few acrylic drops on it in my stash forever, I then added in a ton of extra Dew Drops from The Robin's Nest in silver, light blue, clear, pearl, and white to enhance it.  I also added in some the wonderful chipboard snowflakes to the corners.
http://www.shop.robinsnest-scrap.net/
http://www.shop.robinsnest-scrap.net/http://www.shop.robinsnest-scrap.net/


Throughout the layout I created snowflakes from the diamond dew drops in Pearl and Aquamarine.  

Diamond Dew Drop Tutorial

1) Supplies - Dew Drops, 6 petal flower punch (tiny), cardstock, and clear drying glue

http://www.shop.robinsnest-scrap.net/http://www.shop.robinsnest-scrap.net/

2) Punch a flower in paper matching the color of the dew drops and count out 6 diamond dew drops per snowflake.

 3) Apply glue to the petals of the flower and glue down dew drops.


4) Enjoy to completely snowflakes and apply to your projects!!  The fun part about the clear colored dew drops is you can see the flower punch below so it creates a more 3D snowflake!


Supplies Used
Patterned Paper - The Robin's Nest
Cardstock - The Robin's Nest
Metallic paper - DCWV
Rub-ons - The Robin's Nest
Glitter Chipbaord - The Robin's Nest
Dew Drops - The Robin's Nest
Snow Tex - Decoart
Mediums/Glitter/Mica - Imgaination Crafts
Stencil - Imagination Crafts
Spatula - Imagination Crafts
Glittered Wire - Recolletions
Adhesive - Beacon & Tombow
Punch - EK
Circle Cutter - Kreaxions
Trimmer - Fiskars
 Enjoy!

Saturday, September 27, 2014

Spooktactular **The Robin's Nest**

In 2012 my son Brandon was 2 and he fell in love with this spider costume.  We showed him a ton of costumes, they either scared him or he seemed completely uninterested, and the spider was the only one that he did not try and tear off, so the spider it is!!  He was so cute, my little fuzzy purple spider!!


I used the wonderful paper, Dew Drops, Rub-Ons, and glitter cardstock from The Robin's Nest to create this layout.  Please head on over to The Robin's Nest Blog to see more details!!

Supplies Used
Cardstock - The Robin's Nest
Patterned Paper - The Robin's Nest
Glitter Chipboard - The Robin's Nest
Dew Drops - The Robin's Nest
Rub-on - The Robin's Nest

Foil Paper - DCWV
Alpha Stickers - Momenta
Stickers - Paper House Productions
Spiders -Jolee's
Circle Cutter - Kreaxions - Just Imagine
Ink - Prima
Adhesive - Beacon & Scotch
Enjoy!!


http://scraps-of-reflections.blogspot.com/

Wednesday, March 26, 2014

my kids ***Just Imagine & Birds of a Feather Kit***

I took this picture right before my we went on our family vacation last summer - turned out to be more of a house hunting trip as 5 months later we had moved to where we vacationed.  I dressed all three kids in the same outfit, a yellow shirt from Canada from Grandma Elaine with orange shorts.  Probably one of the only times I will dress them so alike, so I had to take a picture of it - and low and behold they all smiled and were looking at the camera (Morgan 7, Brandon 3, Catherine 10 months).  A great start to our vacation.


Here I used Kreations punch 923 with insert A to created a border punch from Just Imagine Crafts.  I used it along the top and the bottom of the layout and backed the grey paper behind it so it shows a pop of color under the punch.


I also used the punch along the top side of the brown paper just above the picture for even more texture and dimension.  This punch is so versatile and fits any gender - not to girly or boyish, just a great geometric shape.
Here I played with the stencil from the March kit from Birds of a Feather Kit Co.  I traced the lines of the stencil with a black marker and used it for a journal tag.  I also used the acrylic parts from the kit that I had used alcohol ink on in my technique Tuesday seen below and added cardstock behind it and added a wood piece on top.

I love this little acrylic photo elements from Basic Grey in our March kit, they are just too cute!!  Sometimes I want to change the color or look of items, it just does not "fit" with the page or project I am working on.  Acrylic does not take color like paper or chipboard, so mists and most inks will not work on them, they just rub off, so this is where alcohol inks come into play.

Acrylic and Alcohol Ink Technique

1) Supplies - BG acrylic items, alcohol ink in color of your choice (I choose brown), small piece of felt.


2) Place a couple of drops - do not add to much a little goes a long way- on the acrylic.


3) Use your felt to smear it around, you can dab it, wipe it, just don't over do it or you will wipe it all off.


4) You can repeat steps 2 and 3 with another color for a complex look, or leave it a single color.
 

5) Enjoy your new color of acrylic!!


Supplies Used:
Cardstock - Birds of a Feather Kit - Bazzill
Patterned paper - Birds of a Feather Kit- Basic Grey and Bazzill
Wood - Birds of a Feather Kit - Freckled Fawn
Stencil - Birds of a Feather Kit - TCW
Acrylic - Birds of a Feather Kit - Basic Grey
Stickers (grey) - Birds of a Feather Kit - Basic Grey
Punch - Kreations
Ink/paint - Ranger
Pen - Faber Castell
Alpha letters (brown) - Thickers
 
Enjoy!!

Share This

Related Posts Plugin for WordPress, Blogger...