Tuesday, December 17, 2013

HoHoHo Banner **Susan K. Weckesser**

I stumbled across this banner at Target in the dollar spot, and it just begged to be dressed up and decorated!!


Here I took some close up pictures of sections of the banner so you can see it better.

You can see the clusters of ribbon and flowers between each section of the banner, it really helped liven it up and make it a lot more festive!!


At each end of the banner i tied a simple bow using both gold and silver ribbon from May Arts Ribbon, it really helped finish the look of the banner.


Never be afraid to take an item an spruce it up yourself, it makes it one of a kind and it is cheaper than buying a fancy one.  The first thing I did was to liven up the banner itself by stamping it with Susan K. Weckesser stamps and Ranger Ink.  I used the "Celebrate The Simple Things" triangle stamps and stamped randomly all over the banner as you see below.

http://www.susankweckesser.com/susan_k_weckesser_incproducts


Then I took silver ribbon from May Arts Ribbon and wound it around the entire top portion of the banner.  I then places a gold or silver bow along with flowers and holly leaves to create clusters between the triangle parts of the banner. 


Supplies Used
Banner - Target
Ribbon - May Arts Ribbons
Flowers and leaves - Prima
Ink - Ranger 
Stamps - Susan K. Weckesser

Enjoy!!

Wednesday, December 11, 2013

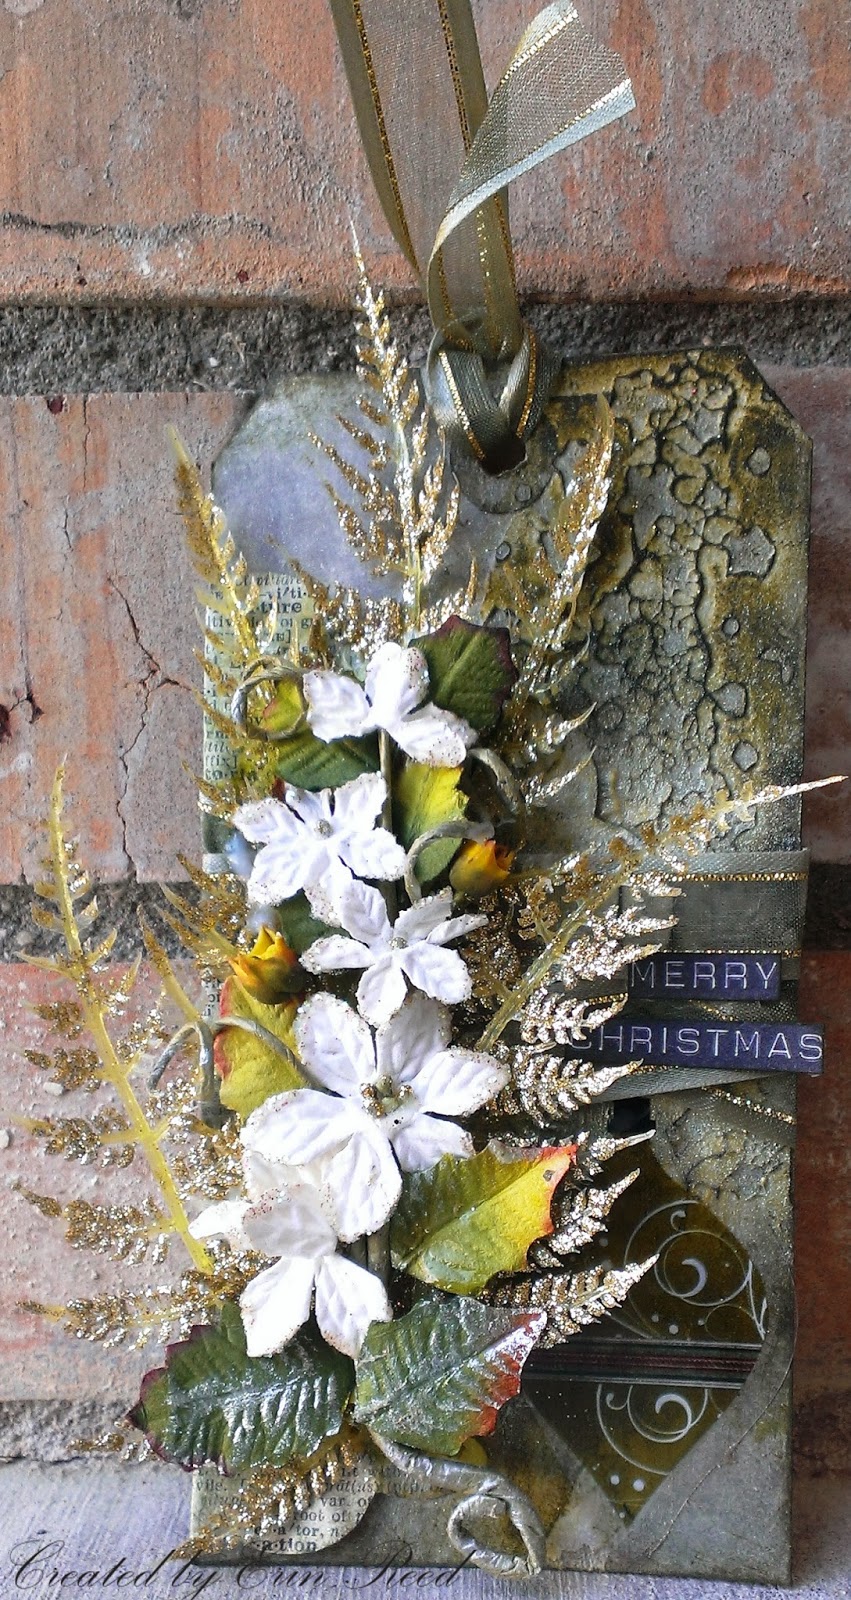
Merry Christmas Tag **The Art Studio @ SNR and Off the Rails Scrapbooking**

It is always fun to make a tag, it is a small mini project where you can try out something new, and if you mess up no biggie make a new one.  The other wonderful thing about tags is you can use them; give them on gifts (Christmas and birthday are always useful), used instead of cards, or just something fun to prop up next to your computer for some inspiration!!


I went for a shabby chic, evergreen, winter white feel to the tag, I tried to give it a rustic feel plus I wanted to try out some gel medium I just got, and the best time to play is with a tag!!


First I started out with a die cut doily from a book (encyclopedia actually) and glued it to the tag off to the left and wrapped around to the back, it is off center. 


I found this plastic raised star rubbing template in my kids crafts, it is used to make rubbings from crayons onto paper.  I thought it would make a good mold for the gel medium.  I added a smear of gel medium to the top right down and pressed the star template into the paste.  It gave it wonderful bumps and ridges plus a few distinct stars.  After it dried sprayed the entire tag with various green mists made from gelato (super easy take a bit of gelatos and mix it in water to make a spray) and a bronzer gelato mist.    


 Once the mist dried I rubbed a a few dark green and brown colors of gelatos (straight front the tube with my finger) across the top of the bumps and ridges of the dried modeling paste to create contrast.


I then added in a wonderful vine, some glittery leaves, sentiment, and a cute little cutout of an ornament from acetate (transparency paper).

Head on over to The Art Studio @ SNR to see more wonderful tags the rest of December and don't forget you can enter into the brand new challenge site of OFF THE RAILS SCRAPBOOKING with the challenge theme of acetate (transparency paper).


Supplies Used
Tag - Recollections
Die cut - Fancy Pants
Patterned Paper - Fancy Pants
Flowers - Prima
Leaves - Recollections
Transparency - Fancy Pants
Ribbon -May Arts
Ink - Ranger
Mists -Faber-Castell
Mediums - Liquitex and Faber-Castell
Rubbing Template - dollar store

Enjoy!!

Friday, December 6, 2013

Merry Christmas **Susan K. Weckesser & Flamingo Scraps**

Last December my friend took these wonderful pictures of my boys (plus some of me, my mom, and my daughter) when they were a week away from being 3 and 7 years old.  I just fell in love with the head shots of both boys, but could never find the inspiration to create a layout with them, until now!!


Putting pictures in Polaroid frames is huge right now, so I could not resist playing around with the idea and with the Maya Road frames.  My pictures were not the correct size, so I added a paper border inside and then added their names below.  I also wanted to try out my new Martha Stewart circle punch (it made the doilies behind the pictures).  I then added in my own layers and clusters for lots of dimension and fun.  You can also see Heidi Swapp's file folder tucked in the layers!!


Here you can see some of the May Arts twine looped around to make a fun flourish behind the Prima flowers.  I then added in a fun Tim Holtz charm, which is all stacked up on top of Maya Road chipboard, Basic Grey 25th and Pine die cuts and paper, and some wonderful Susan K. Weckesser Stamps used with various colors of red and brown Ranger Distress Inks.  

I used the following sets of stamps from Susan K. Weckesser all layered on top of each other for lots of dimension:
http://www.susankweckesser.com/welcome


Here you can see some I stamped on the Maya Road Chipboard with one of the Susan K. Weckesser Stamps after painting it with Clearsnap Smooch Paint.   You can see Cosmo Cricket wood stars, Prima lace,  and some of my paint splatters and circle marks I made with Tattered Angels and Heidi Swapp Mists (here is a link to the tutorial on how I make them).

Supplies can be found at Flamingo Scraps - head on over to see them, lots of great sales to be had!!

Supplies used


Saturday, November 30, 2013

Ornament Trio - Part 1 **Susan K. Weckesser**

I keep seeing all these cute little ornaments everywhere, glass or plastic balls that are hollow, spherical just begging to be filled with something.  So I did!

Here is the trio I made using lots of items from Ranger, Core'dinations, May Arts ribbons, and of course Susan K. Weckesser stamps!!


 You can find these spherical ornament balls at any craft store, I got plastic ones because they will inevitably be dropped my me or my kids  You pop the top off and fill let you imagination soar.


For the first ornament I used Ranger alcohol inks and placed a few drops of reds and greens inside the ball and swirled it around.  


I then took the flag banner stamp for the Create your Day stamp set from Susan K. Weckesser and stamped the outside of the ball in black solvent ink.

Create your Day 1

I then took a cluster of flowers on wire stems and wrapped it around the top of the ball, attached the top, created a ribbon just under the flower cluster, and then strung it up with some beautiful gold wide ribbon from May Arts Ribbon.


For the Second ornament ball I stuffed the inside of 2 long stands of May Arts Ribbon (wide red and wide green) and tied a large bow with coordinating red and green ribbon, added the top back on, and strung it up with the same May Arts ribbon as the bow.  Could not be any easier!!


For the third ornament I heat embossed the cute little snowman stamp from Susan K. Weckesser's Let it Snow stamp set on Black Magic paper from Core'dinations.  You then sand the paper down and it creates a resist of the stamp after it has been heat embossed.  

http://www.susankweckesser.com/welcome


I then cut out the little snowman and used Stickles by Ranger in various colors and dusted him in flower soft to make it look like he is dusted in snow.


I then placed the snowman in the ball hung from the topper so it would not fall over, and filled the bottom of the ball with diamond dust so it looked like the snowman was sitting in snow.


 I then added in a flower cluster to the top along with a bow in silver ribbon for May Arts Ribbons.


Strung up the ornament with gold ribbon from May Arts Ribbon and it is done!  My little winter snowman in a ball!

.

Supplies Used
Ball Ornaments - Recollections
Ink/embossing/Stickles - Ranger
Ribbon - May Arts Ribbon
Cardstock -  Core'dinations
Stamps - Susan K. Weckesser
Flowers - Prima, Petaloo, Recollections
Diamond Dust - Flora Craft
Flower Soft - Flower Soft

Enjoy!!


http://scraps-of-reflections.blogspot.com/

Sunday, November 24, 2013

CLC Ranger Prize Winner

 It was so fun to see all the wonderful projects everyone was making for others for the Christmas Love Campaign, so inspiring!!

So now for the winner!!

Donna Sullivan!!

Grats, please email me you info for your prize!!

Thursday, November 21, 2013

A grateful heart is a joyful heart - card - With Resist Stamp Mist Tutorial **The Art Studio @ SNR**

I love seeing those beautiful background of papers from tons of different companies - they look distressed, dimensional, and gorgeous.  Here I will show you how I made a small 6x6 distressed misted paper for a card using stamps, ink, and mists.


 Resist Stamp Mist Tutorial

1) Supplies - Cardstock (light colored - tan, white, cream), spray mists in your choice of color, ink in your choice of color to correlate with your mists, and acrylic stamps.

2) When picking out your stamps use one that looks like the object you want to stamp, resist spraying will not show the detail of the stamp, just the outline.  I chose a leaf shape (butterflies, hearts, flowers, birds all work great too).  Lay your stamp on the paper flat side down (so there are no gaps between the paper and your stamp, raised parts facing up).  Spray your mist lightly, carefully pick up your stamp, move to a new location on the paper, spray with a different color (start with your lightest color first then move to your darkest color last), keep rotating and spraying until you have the look you want.


 3) I added a few drops of mist from the stamp leftover from misting resist technique to drop onto my paper for a better effect.


4) Pick out a different stamp for contract effect.  I went for another leaf stamp and chose a dark color (brown) for contrast.  I use a solvent ink (like StazOn) for this so it would not bleed into the wet mists.  I used both primary stamps (just applied ink to the stamp) and secondary stamps (stamped 2 times before reapplying ink to the stamp).  Stamp around the page, coming off the paper, across, layer it - remember this is supposed to look distressed and shabby!!


 5) Stamp in your resist spaces you created with the front side of the stamp (fill in the holes).  Pick a color that is similar to your mists (I chose orange) in a distress ink.  Steps 4 and 5 and be done in either order.


6) Now you can chose to do what you like with your new background paper.  You can make your paper as large as a 12x12, or cut it up and use it as your wish!!

Come check out all of the great ideas and projects at The Art Studio Blog!!

Supplies used:
Cardstock - Core'dinations and DCWV
Patterned paper - Glitz and Graphic 45
Ink - Ranger and StazOn
Mists - Heidi Swapp and Dylusions
Flower - Maya Road
Bling - Prima
Twine - Other
Stamps - Prima and Inkadinkado
Leaf Doily - Dollar Store
Leaves - Other

Enjoy!!

Monday, November 18, 2013

Fancy Pants Corrugate Paper Product Review **Flamingo Scraps**

I recently got to play around with some of the Corrugate Paper from Fancy Pants, and compared to cardboard this won hands down!!

In the pack you receive 6 12x12 sheets in colors as seen below.

http://flamingoscraps.com/shop/
 The colors are fantastic, they cut through my cutter with ease, and look wonderful on all kinds of paper projects!!  You could use these papers as is, or use paint, mist, ink, or other mediums to dress them up.  There are just so many uses for these papers!!

 Here you can see how you can tear or cut the paper (pictured in grey), one side is torn and the other was cut using a Fiskars blade cutter.


Here I played with the ridges of the paper and Heidi Swapp Color Shine mists to see how well it would hold color.  It worked beautifully.  It retained the color with only have to spray it once.


Here I took the same misted corrugate paper and inked the tops of the ridges with dark brown to create a contrast, and it turned out very cool.  Now I can't wait to try this sheet out on a project!!  Come back soon to see what I did with it!!


You can find this product plus many more over at Flamingo Scraps.  

Enjoy!!


Share This

Related Posts Plugin for WordPress, Blogger...